2019.06.17
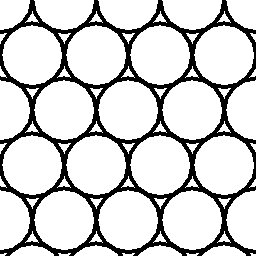
円模様2(隙間の少ない整列)
はじめに

Javaソースコード
Pattern_Circle02.java
001
002
003
004
005
006
007
008
009
010
011
012
013
014
015
016
017
018
019
020
021
022
023
024
025
026
027
028
029
030
031
032
033
034
035
036
037
038
039
040
041
042
043
044
045
046
047
048
049
050
051
052
053
054
055
056
057
058
059
060
061
062
063
064
065
066
067
068
069
070
071
072
073
074
075
076
077
078
079
080
081
082
083
084
085
086
087
088
089
090
091
092
093
094
095
096
097
098
099
100
101
import java.awt.image.BufferedImage;
import java.awt.Graphics2D;
import java.awt.Color;
import java.awt.BasicStroke;
import java.io.File;
import javax.imageio.ImageIO;

public class Pattern_Circle02 {
	public static void main(String[] args) {
		// 変数宣言
		int w, h;			// 画像サイズ
		int radius;			// 円の半径
		int line_w;			// 線幅
		String outname;			// 出力ファイル名
		BufferedImage img = null;	// 画像格納クラス

		// 入力した引数が5以上かを調べる
		if ( 5 > args.length ) {
			// 入力した引数が5未満の場合、使用方法を表示する
			System.out.println(
				"Pattern_Circle02 [PNG名] [画像幅] [画像高] [円半径] [線幅]" );
			return;
		}

		try {
			// 引数を変換し、画像の幅と高さをwとhに代入
			w =  Integer.valueOf( args[ 1 ] );
			h =  Integer.valueOf( args[ 2 ] );

			// 引数を変換し、円の半径radiusに代入
			radius = Integer.valueOf( args[ 3 ] );
			if ( 1 > radius ) {
				System.out.println( "円の半径に1以上を指定!" );
				return;
			}

			// 引数を変換し、線幅line_wに代入
			line_w = Integer.valueOf( args[ 4 ] );
			if ( 1 > line_w ) {
				System.out.println( "線幅に1以上を指定!" );
				return;
			}
		}
		catch( NumberFormatException ne )
		{
			System.out.println( "引数が不正です" );
			return;
		}
		// 出力PNG名をoutnameに代入(拡張子".png"省略なし)
		outname = args[ 0 ];

		// 新規画像を作成
		img = new BufferedImage( w, h, BufferedImage.TYPE_INT_RGB );
		Graphics2D g = (Graphics2D)img.getGraphics();
		g.setColor( Color.white );	// 背景色を白に設定
		g.fillRect( 0, 0, w, h );	// 背景で画像全体を塗る

		// 模様を作成
		int x, y;
		int row;
		int start_x;
		int pitch_x, pitch_y;

		// xとyの間隔を代入
		pitch_x = radius * 2;
		pitch_y =  (int)(  (double)radius * Math.sqrt( 3.0 ) );

		// 線の色を黒に設定
		g.setColor( Color.black );
		// 線幅をline_wに設定
		g.setStroke( new BasicStroke( line_w ) );

		// 円模様の描画
		row = 0;
		for ( y = 0; y <= ( h + radius ); y = y + pitch_y ) {
			++ row;
			if ( 1 == ( row % 2 ) )
				start_x = 0;
			else
				start_x = -radius;
//
			for ( x = start_x; x <= ( w + radius ); x = x + pitch_x ) {
				g.drawOval( x - radius, y - radius, radius * 2, radius * 2 );
			}
		}


		try {
			// imgをoutname(出力PNG)に保存
			boolean result;
			result = ImageIO.write( img, "PNG", new File( outname ) );
		} catch ( Exception e ) {
			// outname(出力PNG)の保存に失敗したときの処理
			e.printStackTrace();
			return;
		}

		// 正常に終了
		System.out.println( "正常に終了しました" );
	}
}
コンパイル ソースコードが「ANSI」の場合
C:\talavax\javasample>javac -encoding sjis Pattern_Circle02.java
コンパイル ソースコードが「UTF-8」の場合
C:\talavax\javasample>javac Pattern_Circle02.java
実行
C:\talavax\javasample>java Pattern_Circle02 circle02.png 256 256 32 4
Javaソースコードの解説
001
002
003
004
005
006
import java.awt.image.BufferedImage;
import java.awt.Graphics2D;
import java.awt.Color;
import java.awt.BasicStroke;
import java.io.File;
import javax.imageio.ImageIO;
Javaのクラスライブラリの中から「java.awt.image.BufferedImage」と「java.awt.Graphics2D」と「java.awt.Color」と「java.awt.BasicStroke」と「java.io.File」と「javax.imageio.ImageIO」というパッケージにあるクラスを、このプログラム内で使うために記述します。
008
public class Pattern_Circle02 {
クラス名を、Pattern_Circle02としています。
009
public static void main(String[] args) {
010
011
012
013
014
015
		// 変数宣言
		int w, h;			// 画像サイズ
		int radius;			// 円の半径
		int line_w;			// 線幅
		String outname;			// 出力ファイル名
		BufferedImage img = null;	// 画像格納クラス
017
018
019
020
021
022
023
		// 入力した引数が5以上かを調べる
		if ( 5 > args.length ) {
			// 入力した引数が5未満の場合、使用方法を表示する
			System.out.println(
				"Pattern_Circle02 [PNG名] [画像幅] [画像高] [円半径] [線幅]" );
			return;
		}
025
026
027
028
029
030
031
032
033
034
035
036
037
038
039
040
041
042
043
044
045
046
047
048
049
050
		try {
			// 引数を変換し、画像の幅と高さをwとhに代入
			w =  Integer.valueOf( args[ 1 ] );
			h =  Integer.valueOf( args[ 2 ] );

			// 引数を変換し、円の半径radiusに代入
			radius = Integer.valueOf( args[ 3 ] );
			if ( 1 > radius ) {
				System.out.println( "円の半径に1以上を指定!" );
				return;
			}

			// 引数を変換し、線幅line_wに代入
			line_w = Integer.valueOf( args[ 4 ] );
			if ( 1 > line_w ) {
				System.out.println( "線幅に1以上を指定!" );
				return;
			}
		}
		catch( NumberFormatException ne )
		{
			System.out.println( "引数が不正です" );
			return;
		}
		// 出力PNG名をoutnameに代入(拡張子".png"省略なし)
		outname = args[ 0 ];
与えられた引数をそれぞれ、作成する画像の幅/高さ、円ピクセル半径、ピクセル線幅、出力PNG名を格納する変数に代入しています。画像の幅/高さ、円ピクセル半径、ピクセル線幅の引数はString型なので、Integerクラスを使ってint型に変換しています。
053
img = new BufferedImage( w, h, BufferedImage.TYPE_INT_RGB );
BufferedImageコンストラクタ
BufferedImage( int width, int height, int imageType )
・新しい BufferedImage を構築します。
  パラメータ width     : 構築する画像の横ピクセル
        height    : 構築する画像の縦ピクセル
        imageType : 構築する画像のイメージ形式
054
055
056
		Graphics2D g = (Graphics2D)img.getGraphics();
		g.setColor( Color.white );	// 背景色を白に設定
		g.fillRect( 0, 0, w, h );	// 背景で画像全体を塗る
img.getGraphics()でグラフックスコンテキストを取得し、背景を白で塗り潰しています。
ここで、グラフックスコンテキストを取得するとは、作成したBufferedImage imgに対してライン/円/多角形などのグラフィック描画を行うためのGraphics2Dクラスを取得することです。ここで取得したGraphics2Dクラスのgにグラフィック描画を行うとimgに反映されます。
058
059
060
061
062
		// 模様を作成
		int x, y;
		int row;
		int start_x;
		int pitch_x, pitch_y;
064
065
066
		// xとyの間隔を代入
		pitch_x = radius * 2;
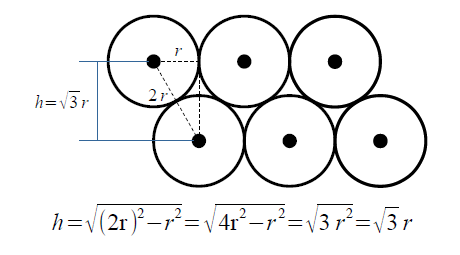
		pitch_y =  (int)(  (double)radius * Math.sqrt( 3.0 ) );
中心座標の位置の関係は、以下の図を参考にしてください。

068
069
		// 線の色を黒に設定
		g.setColor( Color.black );
描画する円の色を黒に設定しています。
Graphics.setColorメソッド
public abstract void setColor( Color c )
・このグラフィックスコンテキストの現在の色を、指定された色に設定します。

  パラメータ c : 色

  戻り値   なし
070
071
		// 線幅をline_wに設定
		g.setStroke( new BasicStroke( line_w ) );
Graphics.setStrokeメソッド
public abstract void setStroke( Stroke s )
・このグラフィックスコンテキストのストロークを設定します。

  パラメータ s : ストローク

  戻り値     なし
073
074
075
		// 円模様の描画
		row = 0;
		for ( y = 0; y <= ( h + radius ); y = y + pitch_y ) {
076
077
078
079
080
			++ row;
			if ( 1 == ( row % 2 ) )
				start_x = 0;
			else
				start_x = -radius;
081
082
083
084
//
			for ( x = start_x; x <= ( w + radius ); x = x + pitch_x ) {
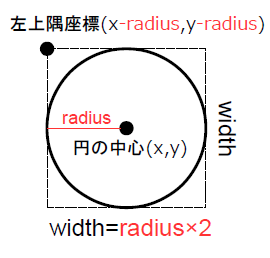
				g.drawOval( x - radius, y - radius, radius * 2, radius * 2 );
			}
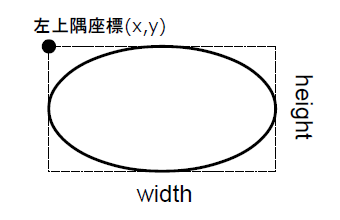
以下に、drawOvalの仕様を記載します。参考にしてください。
Graphics.drawOvalメソッド
public abstract void drawOval( int x, int y, int width, int height )
・楕円の輪郭線を描きます。
  パラメータ x      : 描画する楕円の左上隅のx座標
        y      : 描画する楕円の左上隅のy座標
        width  : 描画する楕円の幅
        height : 描画する楕円の高さ

  戻り値   なし


088
089
090
091
092
093
094
095
096
		try {
			// imgをoutname(出力PNG)に保存
			boolean result;
			result = ImageIO.write( img, "PNG", new File( outname ) );
		} catch ( Exception e ) {
			// outname(出力PNG)の保存に失敗したときの処理
			e.printStackTrace();
			return;
		}
BufferedImageクラスのimgのメモリ内のデータを、出力PNG名の変数(outname)に格納されているファイル名で保存します。この場合は、PNGファイル名が不正であったり、保存先のHDDなどが存在していなかったり、空き容量が少ないなどが原因で処理が失敗する可能性があります。
098
099
		// 正常に終了
		System.out.println( "正常に終了しました" );
全ての処理が正常終了すると、ここまで処理が実行されます。
以上です。
円模様2(隙間の少ない整列)に関するコンテンツ
関連コンテンツ
一般に使われている画像フォーマットには、いろいろな種類があります。画像フォーマットBMP、JPEG、PNG、GIF、TIFFの特徴を知ってますか?


